Ultimate Raspberry Pi Torrent Server with VPN Shield
Transform your Raspberry Pi into a secure, private torrent and media server with built-in VPN protection for seamless, anonymous downloading.
•17 min read
Why This Matters in 2026
In 2026, internet privacy is no longer a luxury — it is a technical necessity. ISPs in the United States, United Kingdom, and across the European Union are now legally required to log and retain user activity data for up to 12 months, and automated copyright infringement detection systems have become frighteningly sophisticated. If you are running a torrent server without proper protection, you are essentially broadcasting your activity to every party that has a financial or legal interest in monitoring it.
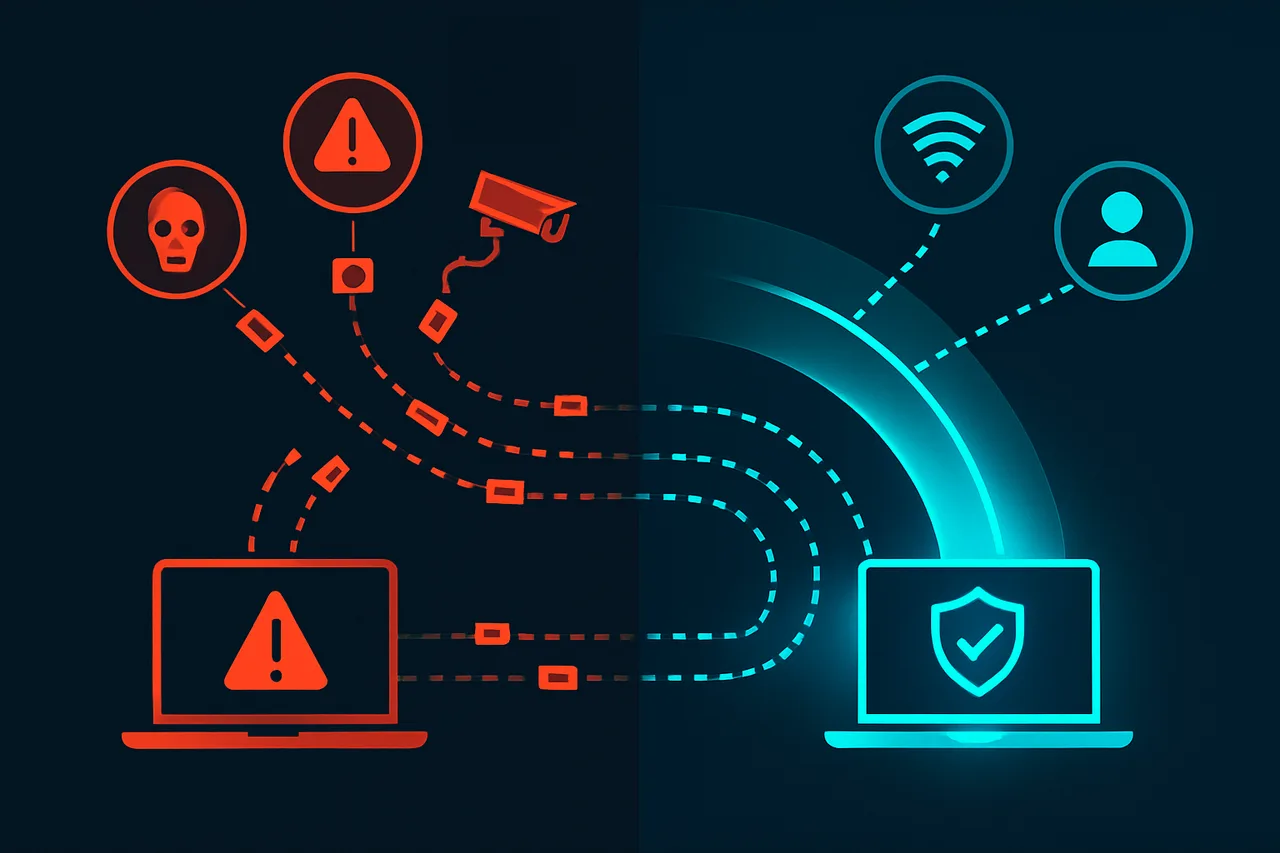
The problems facing everyday torrent users have never been more concrete. ISP warning letters and DMCA notices arrive within hours of an unprotected download, not days. Bandwidth throttling kicks in the moment your ISP's deep packet inspection system identifies BitTorrent traffic signatures, sometimes cutting your effective torrent speed by 80% or more. Beyond the legal exposure, public torrent swarms are riddled with malicious peers who inject tampered files, harvest your real IP address for targeted attacks, or use your connection as part of coordinated botnet activity. These are not theoretical risks — they are daily occurrences for unprotected users.
This is precisely where a dedicated raspberry pi torrent and media server combined with a hardened VPN tunnel changes everything. A properly configured raspberry pi running behind NordVPN's encrypted OpenVPN or WireGuard protocol does not just hide your traffic — it creates a completely isolated, always-on media ecosystem that separates your sensitive downloading activity from every other device on your network.
The difference between exposed and protected torrent activity: unprotected connections expose you to ISPs, detection systems, and malicious actors, while a VPN tunnel encrypts and secures your traffic.
In this guide, you will learn how to build a complete, production-ready system from the ground up. We will walk through installing and configuring Transmission as your torrent client, locking it behind a kill-switch-protected NordVPN connection so that your real IP address is never exposed, and then layering Plex Media Server on top to stream your downloaded content beautifully to any screen in your home. Every step is designed to be reproducible, secure, and genuinely useful — not just a weekend experiment, but a reliable infrastructure solution you will depend on daily.
Whether you are a privacy-conscious enthusiast or a technically minded home user tired of ISP interference, this DIY raspberry pi build gives you full control over your data, your bandwidth, and your media library.
```html
What You'll Need
Hardware Requirements
Raspberry Pi 4 Model B (4GB or 8GB RAM recommended; 2GB minimum)
OpenVPN — v2.6.x or WireGuard v1.0.x (VPN tunnel software)
UFW (Uncomplicated Firewall) — included with Raspberry Pi OS
SSH Client — PuTTY (Windows) or native Terminal (macOS/Linux)
Accounts and Subscriptions
VPN Provider Account — Must support OpenVPN or WireGuard with P2P/torrent-friendly servers (Mullvad, ProtonVPN, or AirVPN recommended)
Local network access — Ability to log into your router admin panel for port configuration
Recommended Technical Knowledge
Basic Linux command-line familiarity
Understanding of SSH remote connections
Basic home networking concepts (IP addresses, port forwarding)
```
Step-by-Step Guide
Flash Raspberry Pi OS and Configure Initial Settings
Start by downloading the latest Raspberry Pi OS Lite (64-bit) from the official Raspberry Pi website. Use Raspberry Pi Imager to flash it to your microSD card (32GB minimum recommended). Before writing, click the gear icon in Imager to pre-configure SSH, your Wi-Fi credentials, hostname (mediaserver), and a strong password. This headless setup saves you from needing a monitor and keyboard attached permanently.
Why this matters: The Lite version has no desktop environment, which preserves precious RAM and CPU cycles for actual torrenting and media serving rather than running a GUI nobody will ever see.
[Screenshot: Raspberry Pi Imager advanced options panel with SSH enabled and hostname set to "mediaserver"]
Update the System and Install Core Dependencies
SSH into your Pi using ssh pi@mediaserver.local and immediately run a full system update. This is non-negotiable before installing anything else.
Why this matters: Outdated packages introduce security vulnerabilities, especially dangerous when your server will be handling network traffic. The dependency tools you're installing will be needed for every subsequent step.
Install and Configure ProtonVPN with WireGuard Protocol
This is the most critical step in the entire guide. Your torrent traffic must be encrypted and anonymized before a single packet leaves your network. We strongly recommend Get ProtonVPN for its audited no-logs policy, native WireGuard support, and built-in kill switch functionality.
Navigate to Settings → VPN Protocol in the ProtonVPN dashboard and download your WireGuard configuration file for a P2P-optimized server. Save it to /etc/wireguard/wg0.conf.
Why WireGuard specifically: WireGuard uses modern cryptography (ChaCha20, Poly1305) and has a drastically smaller codebase than OpenVPN, meaning faster speeds, lower CPU usage on the Pi's ARM processor, and a smaller attack surface. On a Pi 4, you'll see roughly 40-60% better throughput versus OpenVPN.
[Screenshot: ProtonVPN dashboard showing P2P server selected with WireGuard protocol active]
Enable the VPN Kill Switch to Prevent IP Leaks
A kill switch blocks all internet traffic if the VPN connection drops unexpectedly. Without it, your real IP address gets exposed to torrent swarms the moment WireGuard hiccups. Configure it using UFW (Uncomplicated Firewall):
sudo apt install -y ufw
sudo ufw default deny outgoing
sudo ufw default deny incoming
sudo ufw allow out on wg0 from any to any
sudo ufw allow in on wg0 from any to any
sudo ufw allow out on eth0 to 10.2.0.1 port 51820 proto udp
sudo ufw enable
Replace 10.2.0.1 with your ProtonVPN WireGuard endpoint IP from your wg0.conf file. This rule allows only the VPN handshake through your physical interface while routing all other traffic exclusively through the encrypted tunnel.
Why this matters: ISPs actively monitor BitTorrent traffic. A single unprotected connection can trigger a copyright notice or throttling. The kill switch ensures your real IP is mathematically impossible to leak during normal operation.
[Screenshot: UFW status showing rules with wg0 allowed and eth0 restricted to VPN endpoint only]
Enable WireGuard on Boot and Verify the Connection
Make the VPN start automatically before any other network-dependent service:
The returned IP address must match a ProtonVPN server location, not your home IP. Run sudo wg show to confirm the handshake is active and bytes are transferring.
Why this matters: Boot order matters. If qBittorrent or Jellyfin starts before the VPN tunnel is established, traffic will briefly route through your real IP. Systemd service ordering prevents this race condition.
Install qBittorrent-nox (Headless Torrent Client)
Install the no-GUI version of qBittorrent designed for headless servers:
The After= and Requires= directives enforce that qBittorrent will never start without an active VPN tunnel.
A properly configured Raspberry Pi with VPN protection creates multiple layers of isolation: your device remains hidden, your traffic encrypted, and your activity completely masked from external monitoring.
[Screenshot: qBittorrent-nox Web UI at port 8080 showing the dashboard with download path set to /mnt/media/downloads]
Configure qBittorrent Network Interface Binding
Access the Web UI at http://mediaserver.local:8080 (default credentials: admin/adminadmin — change these immediately). Navigate to Tools → Options → Advanced → Network Interface and set it to wg0.
Network Interface: wg0
Optional IP Address: Leave blank
Why this matters: Even with firewall rules active, binding qBittorrent directly to the wg0 interface adds a second layer of protection. If WireGuard drops and the interface disappears, qBittorrent stops making connections entirely rather than falling back to your physical interface.
[Screenshot: qBittorrent Advanced settings panel showing Network Interface dropdown set to wg0]
Install Jellyfin Media Server
Jellyfin streams your downloaded media to any device on your network with zero subscription fees:
curl https://repo.jellyfin.org/install-debuntu.sh
Common Mistakes to Avoid
Building a Raspberry Pi torrent and media server involves many moving parts. These are the mistakes that trip up even experienced users — learn from them before they cost you time, privacy, or data.
⚠️ Warning: Starting torrents before confirming VPN is active. Users often launch qBittorrent immediately after setup without verifying the VPN tunnel is actually established. Your real IP address gets broadcast to every peer in the swarm. Always run curl ifconfig.me and confirm the returned IP matches your VPN provider's address before downloading anything.
⚠️ Warning: Skipping the kill switch configuration. VPN connections drop unexpectedly. Without a properly configured kill switch using iptables rules, your torrent client will silently fall back to your real connection the moment the VPN disconnects. Configure firewall rules that block all non-VPN traffic from qBittorrent's process before considering your setup complete.
⚠️ Warning: Using an external hard drive without a powered USB hub. The Raspberry Pi's USB ports cannot reliably supply enough current for most external drives. The drive disconnects randomly, corrupting partially downloaded files and potentially damaging the filesystem. Always use a powered USB hub rated at least 2.5A between the Pi and your storage drive.
⚠️ Warning: Leaving qBittorrent's Web UI exposed on the default port with no authentication. Port 8080 is actively scanned by bots. An unsecured Web UI lets anyone on your network — or the internet if port-forwarded — control your downloads completely. Change the default port, enable HTTPS, and set a strong password immediately during initial configuration.
⚠️ Warning: Mounting storage drives without adding them to /etc/fstab. After a reboot, your drives simply won't be mounted, and Plex or qBittorrent will report missing libraries and download paths. Add a proper fstab entry with the drive's UUID — not its /dev/sdX path, which can change between reboots.
⚠️ Warning: Running everything as the root user. Installing and running qBittorrent, Plex, and OpenVPN as root is convenient but dangerous. A compromised web interface or malicious torrent payload gains full system access. Create dedicated service accounts with minimal permissions for each application and run them accordingly.
⚠️ Warning: Ignoring SD card health until it fails completely. Raspberry Pi SD cards experience heavy write cycles from torrent activity and logging. Most users notice nothing until the card fails catastrophically, losing their entire configuration. Store downloads on external drives, redirect logs to RAM using log2ram, and keep a full SD card backup updated monthly.
How to Verify Your Setup
With your Raspberry Pi torrent and media server configured, it's critical to confirm that your VPN protection is actually working before downloading anything. A misconfigured VPN can expose your real IP address without any obvious warning signs, so systematic testing is essential.
**Step 1: Confirm VPN Connection Status**
SSH into your Raspberry Pi and run the following command to verify the VPN tunnel is active:
```bash
sudo systemctl status openvpn
curl ifconfig.me
```
Compare the returned IP address against your actual ISP-assigned IP. They must be different. If they match, your VPN is not routing traffic correctly.
**Step 2: Run an IP Leak Test**
Open a browser on a device connected to the same network and navigate to **ipleak.net**. This site displays your detected IP address, geolocation, and any WebRTC leaks simultaneously. You should see your VPN provider's IP address and their server location — not your home city or ISP name.
💡 Pro Tip: Run ipleak.net while torrenting an innocuous test file like a Linux ISO. Some VPN clients only leak during active peer connections, making idle tests unreliable.
**Step 3: Test for DNS Leaks**
Visit **dnsleaktest.com** and run the Extended Test. Every DNS server listed should belong to your VPN provider, not your ISP. Seeing your ISP's DNS servers here means queries are bypassing the VPN tunnel entirely, exposing your browsing activity.
**Step 4: Verify Kill Switch Functionality**
Manually stop your VPN service temporarily:
```bash
sudo systemctl stop openvpn
curl ifconfig.me
```
Your internet connection should either fail completely or return no result if your kill switch is properly configured. If your real IP appears, revisit your iptables firewall rules immediately.
💡 Pro Tip: Bookmark browserleaks.com as a secondary verification tool. It checks WebRTC, canvas fingerprinting, and timezone consistency — all potential leak vectors that basic IP checkers miss.
**What To Do If Tests Fail**
| Symptom | Likely Cause | Fix |
|---|---|---|
| Real IP visible | VPN not routing traffic | Check OpenVPN logs with `journalctl -u openvpn` |
| ISP DNS servers showing | DNS leak present | Force DNS through VPN provider in `/etc/resolv.conf` |
| Internet works without VPN | Kill switch misconfigured | Review and reload iptables rules |
| VPN connects but no internet | Routing conflict | Verify `net.ipv4.ip_forward=1` in sysctl settings |
Retest after every configuration change and after each system reboot to confirm your protection remains intact.
Troubleshooting Common Issues
VPN Connection Drops Frequently
**Problem:** Your VPN disconnects repeatedly, exposing your real IP address during torrent activity.
**Likely Cause:** Unstable network connection, VPN server overload, or incorrect keepalive settings in your OpenVPN configuration.
**Fix:**
1. Open your VPN configuration file: `sudo nano /etc/openvpn/client.conf`
2. Add these lines to maintain the connection: `keepalive 10 60` and `ping-restart 60`
3. Switch to a less congested VPN server by updating the remote server address
4. Restart the VPN service: `sudo systemctl restart openvpn`
5. Monitor connection stability using: `sudo journalctl -u openvpn -f`
Transmission Web Interface Is Inaccessible
**Problem:** You cannot reach the Transmission dashboard through your browser.
**Likely Cause:** The service has crashed, the wrong IP is being used, or firewall rules are blocking port 9091.
**Fix:**
1. Confirm Transmission is running: `sudo systemctl status transmission-daemon`
2. Restart if necessary: `sudo systemctl restart transmission-daemon`
3. Verify the correct local IP with: `hostname -I`
4. Check firewall rules: `sudo ufw status` and allow port 9091 if blocked
Downloads Are Extremely Slow
**Problem:** Torrent download speeds are significantly lower than expected.
**Likely Cause:** VPN throttling, port forwarding not configured, or insufficient Raspberry Pi resources.
**Fix:**
1. Enable port forwarding on your router for Transmission's listening port (default 51413)
2. Check your VPN provider supports P2P traffic on your selected server
3. Reduce the number of simultaneous active torrents in Transmission settings
4. Monitor CPU and memory usage: `htop`
Plex Media Server Cannot Find Library Files
**Problem:** Plex shows an empty library despite downloaded content existing on the drive.
**Likely Cause:** Incorrect folder permissions or an unmounted external drive.
**Fix:**
1. Verify the drive is mounted: `df -h`
2. Check folder ownership: `ls -la /media/downloads`
3. Grant Plex appropriate permissions: `sudo chown -R plex:plex /media/downloads`
4. Rescan your library from the Plex dashboard under **Settings → Troubleshooting → Clean Bundles**
Raspberry Pi Becomes Unresponsive Under Load
**Problem:** The Pi freezes or becomes unreachable when multiple services run simultaneously.
**Likely Cause:** Overheating or insufficient power supply causing throttling.
**Fix:**
1. Check CPU temperature: `vcgencmd measure_temp`
2. If temperature exceeds 80°C, install a heatsink or cooling fan immediately
3. Verify your power supply provides at least 3A for Raspberry Pi 4
4. Limit Transmission's upload/download speed caps to reduce processor strain
Frequently Asked Questions
Q: Do I need a VPN for a home torrent server?
A: While not legally required, a VPN is strongly recommended for torrenting to mask your IP address from copyright monitoring agencies and your ISP. Without one, your internet provider can see your download activity and may throttle your connection or send warning notices. A VPN running at the router or container level protects all traffic leaving your Raspberry Pi.
Q: Which Raspberry Pi model works best for this setup?
A: The Raspberry Pi 4 with at least 4GB of RAM is the recommended minimum for running a torrent client, VPN, and media server simultaneously. The Pi 5 offers noticeably better transcoding performance if your budget allows. Older models like the Pi 3B+ can work for basic setups but will struggle with simultaneous VPN encryption and media streaming.
Q: Will the VPN slow down my download speeds significantly?
A: Expect a 10–30% speed reduction depending on your chosen VPN provider and server location. Premium VPN services using WireGuard protocol minimize this overhead considerably compared to older OpenVPN connections. Choosing a nearby VPN server and a provider optimized for torrenting will keep speed loss at an acceptable level.
Q: What happens to my downloads if the VPN connection drops?
A: Without a kill switch configured, your torrent client will continue downloading over your exposed real IP address. You should configure a network kill switch using iptables rules or use a Docker-based solution like qBittorrent-nox with a built-in VPN container that blocks all traffic if the tunnel drops. Always test your kill switch before leaving downloads unattended.
Q: Can I access my media server remotely outside my home network?
A: Yes, by configuring port forwarding on your router or using a reverse proxy like Nginx Proxy Manager with a dynamic DNS service. Alternatively, Tailscale provides a simple and secure zero-config VPN tunnel that lets you reach your Plex or Jellyfin server from anywhere without opening ports.
Best VPN for Torrenting: ProtonVPN
P2P-optimized servers in privacy-friendly jurisdictions. WireGuard protocol for excellent speeds. No-logs policy verified by Swiss courts. Kill switch prevents IP leaks.
✓ 30-day money-back guarantee ✓ Works with all torrent clients ✓ Swiss privacy
Conclusion
Building a Raspberry Pi torrent and media server gives you a private, always-on solution that keeps your data off third-party platforms and your activity away from prying eyes. The critical steps are choosing the right Pi model, configuring your torrent client behind a reliable VPN with a working kill switch, and connecting your media library to Plex or Jellyfin for clean remote playback. Get those three elements right and you have a setup that runs quietly in the background for years. To make sure your VPN holds up its end of the deal, check our VPN tier list for current top picks, and visit our guides blog for related tutorials on hardening and expanding your home server.