Why This Matters in 2026
In 2026, internet surveillance has reached unprecedented levels. Government agencies routinely monitor traffic, ISPs sell browsing data to advertisers, and cybercriminals exploit public Wi-Fi networks with sophisticated man-in-the-middle attacks. You might think your VPN protects you, but here's the alarming truth: millions of users believe they're anonymous online while their real IP addresses, DNS queries, and location data leak through critical vulnerabilities.
The consequences of VPN failure aren't just theoretical anymore. ISPs now send automated copyright infringement notices within hours of detecting torrent activity. Streaming services have deployed advanced geolocation detection that can identify VPN users even when traditional IP masking works. In countries with strict internet censorship, a single DNS leak can result in blocked access or worse—legal repercussions.
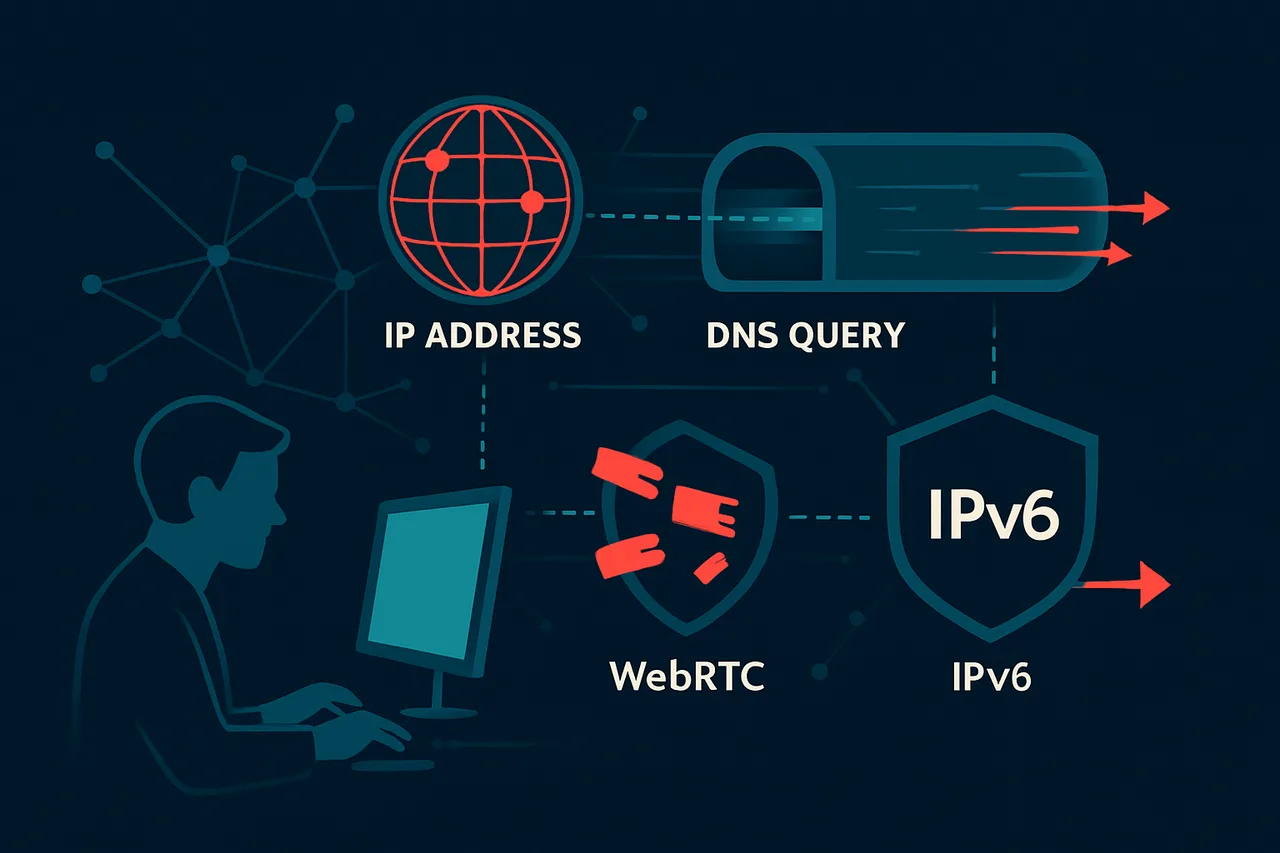
Consider this scenario: You're using a premium service like NordVPN, your connection shows "Protected," and your IP appears changed. Yet your ISP still throttles your streaming, you receive DMCA notices, or geo-restricted content remains blocked. Why? Because connection doesn't equal protection. Modern browsers leak your real IP through WebRTC protocols, DNS requests bypass VPN tunnels, and IPv6 traffic often routes outside encrypted channels entirely.
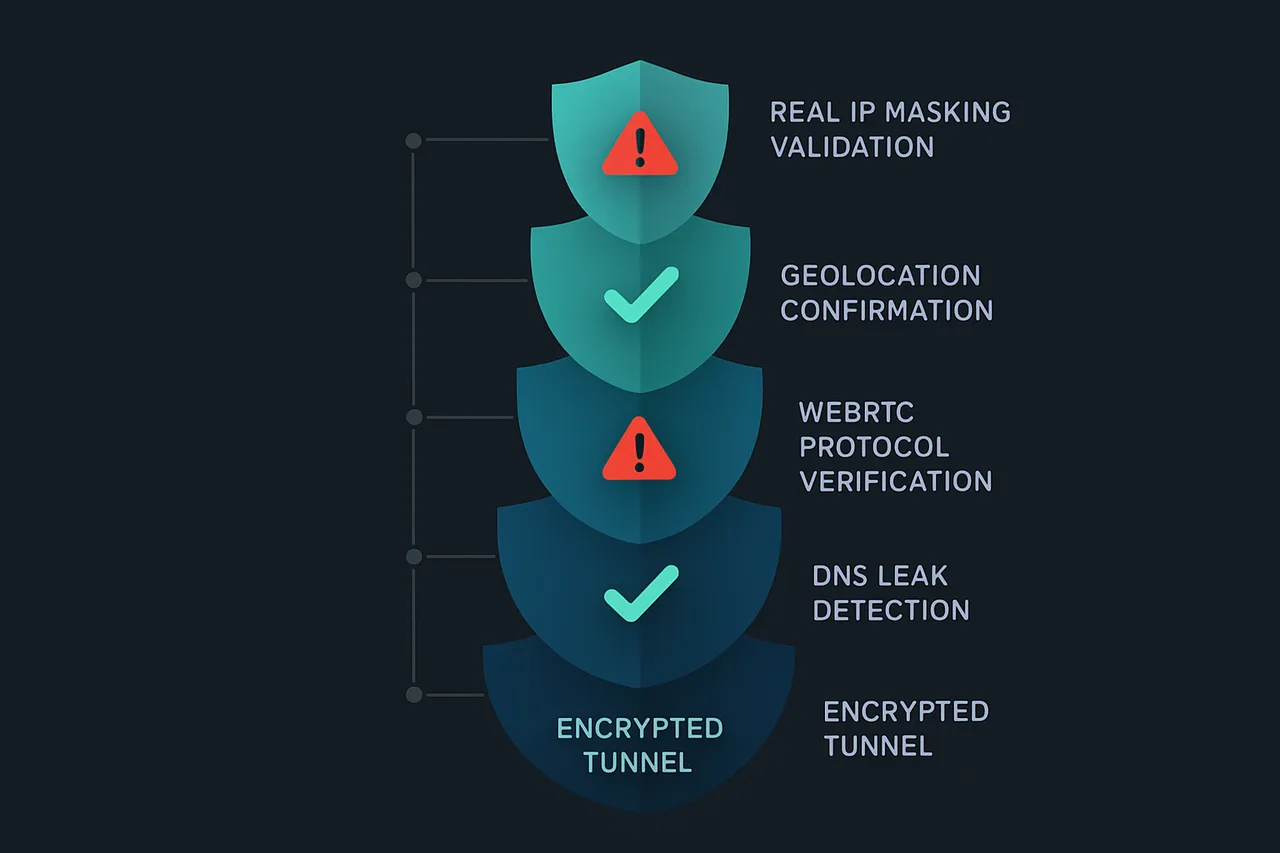
The technical landscape has evolved beyond simple IP masking. Today's threats include DNS poisoning, WebRTC fingerprinting, browser-based location detection, and time zone correlation attacks. A comprehensive VPN test must evaluate multiple potential failure points simultaneously.
This guide will teach you to conduct systematic VPN verification using professional-grade testing methodologies. You'll learn to identify IP leaks, DNS vulnerabilities, WebRTC exposure, and browser fingerprinting weaknesses. We'll cover automated testing tools, manual verification techniques, and real-world scenarios where VPNs commonly fail. By the end, you'll possess the technical knowledge to audit any VPN service thoroughly—whether you're using NordVPN, ExpressVPN, or any other provider—and ensure your digital privacy remains genuinely protected.
What You'll Need
Before testing your VPN's effectiveness, ensure you have the following requirements in place:
Hardware Requirements
- Computer, smartphone, or tablet with internet connectivity
- Minimum 2GB RAM (4GB+ recommended for reliable testing)
- At least 1GB free storage space
- Stable internet connection with minimum 10 Mbps download speed
Software Requirements
- Web Browser: Chrome 90+, Firefox 88+, Safari 14+, or Edge 90+
- VPN Client: Your chosen VPN provider's official app (latest version)
- Operating System:
- Windows 10/11 (build 1903 or later)
- macOS 10.15 Catalina or newer
- iOS 13+ or Android 8.0+ for mobile devices
- Linux distributions with kernel 3.10+ (Ubuntu 18.04+ recommended)
Accounts and Services
- Active VPN subscription with valid login credentials
- Access to online testing tools (no additional accounts required)
- Note of your original IP address and location before connecting
Recommended Additional Tools
- Command Line Access: Terminal (macOS/Linux) or Command Prompt/PowerShell (Windows)
- Network Monitoring: Wireshark 3.6+ (optional, for advanced users)
- Multiple Browsers: For cross-verification of results
Having administrator/root privileges on your device will help with certain advanced tests, though basic VPN verification can be performed with standard user accounts.
Step-by-Step Guide
- Set Up ProtonVPN with WireGuard Protocol
Before testing your VPN, ensure you're using a reliable service with proper security protocols. Get ProtonVPN and configure it with WireGuard protocol for optimal performance and security. In the ProtonVPN app, navigate to Settings > Connection > Protocol and select "WireGuard". This modern protocol offers better performance than OpenVPN while maintaining strong encryption. WireGuard's streamlined codebase reduces potential vulnerabilities and provides faster connection speeds, making it easier to detect if your VPN drops unexpectedly.
[Screenshot: ProtonVPN settings showing WireGuard protocol selected]
Protocol: WireGuard Auto-connect: Fastest Kill Switch: Always-on - Enable Kill Switch Protection Navigate to ProtonVPN Settings > Advanced > Kill Switch and enable "Always-on Kill Switch". This critical feature prevents your real IP address from leaking if the VPN connection drops unexpectedly. The kill switch blocks all internet traffic when the VPN disconnects, ensuring your data never travels unprotected. Without this safeguard, brief connection drops could expose your actual location and browsing activity to your ISP or websites you visit. [Screenshot: Kill switch toggle enabled in ProtonVPN advanced settings]
- Record Your Real IP Address Before connecting to your VPN, document your actual IP address and location. Disconnect from any VPN services and visit whatismyipaddress.com in your browser. Note down your IP address, ISP name, and geographic location. This baseline information is crucial for comparison after connecting to your VPN. Take a screenshot or write down these details, as you'll reference them throughout the testing process to verify your VPN is properly masking your identity. [Screenshot: IP lookup website showing real IP address and location before VPN connection]
- Connect to VPN and Verify IP Change Connect to a ProtonVPN server in a different country than your actual location. Once connected, refresh whatismyipaddress.com and verify that your IP address, ISP, and location have all changed to match your chosen VPN server location. The IP address should be completely different from your recorded baseline, and the ISP should show as ProtonVPN or the VPN provider's infrastructure. If any information matches your original details, your VPN isn't working correctly and requires troubleshooting. [Screenshot: Same IP lookup website now showing VPN server IP and location]
- Test for DNS Leaks
Visit dnsleaktest.com and click "Extended test" to check if your DNS requests are being routed through your VPN. DNS leaks occur when your device continues using your ISP's DNS servers instead of your VPN provider's servers, potentially revealing your browsing activity. The test results should show DNS servers belonging to your VPN provider or their partners, located in the same country as your VPN server. If you see your ISP's DNS servers or servers in your actual location, you have a DNS leak that compromises your privacy.
[Screenshot: DNS leak test showing VPN provider's DNS servers]
To fix DNS leaks, configure your system to use ProtonVPN's DNS servers:
Primary DNS: 10.2.0.1 Secondary DNS: 10.2.0.1 IPv6 DNS: Disabled - Check for WebRTC Leaks
WebRTC (Web Real-Time Communication) can bypass your VPN and expose your real IP address through browser-based applications. Visit browserleaks.com/webrtc and examine the results under "Your Local IP Addresses" and "Your Public IP Addresses" sections. You should only see IP addresses associated with your VPN connection. If your real local IP address (typically starting with 192.168, 10.0, or 172.16-31) appears, you have a WebRTC leak that could compromise your anonymity.
[Screenshot: WebRTC test showing only VPN IP addresses]
To prevent WebRTC leaks in Chrome, install an extension or disable WebRTC in Firefox by navigating to about:config and setting:
media.peerconnection.enabled = false - Perform Speed and Performance Tests Run speed tests at speedtest.net both before and after connecting to your VPN to establish performance baselines. Document your download speed, upload speed, and ping times. A quality VPN like ProtonVPN should maintain at least 70-80% of your original connection speed when using WireGuard protocol. Significant speed drops might indicate connection issues, server overload, or suboptimal routing that could affect your VPN's reliability and increase the likelihood of connection drops. [Screenshot: Speed test results showing before and after VPN connection speeds]
- Test Kill Switch Functionality Deliberately disconnect your VPN while monitoring your IP address to verify the kill switch works correctly. Open whatismyipaddress.com in one browser tab, then manually disconnect ProtonVPN from the app. Your internet connection should immediately stop working, and the browser should show connection errors instead of reverting to your real IP address. If you can still browse or your real IP appears, the kill switch isn't functioning properly, leaving you vulnerable during connection drops. [Screenshot: Browser showing connection error when kill switch activates]
- Verify Geolocation Accuracy Test whether websites correctly identify your VPN server location by visiting multiple geolocation services like iplocation.net, ipinfo.io, and google.com. Search "what is my location" on Google to see if it matches your VPN server's city and country. Consistent geolocation results across multiple services indicate your VPN is successfully masking your location. Inconsistent results might suggest your VPN connection is unstable or that some traffic is leaking outside the VPN tunnel. [Screenshot: Multiple geolocation services showing consistent VPN server location]
- Monitor Connection Stability
Use continuous monitoring tools to verify your VPN maintains stable connections over extended periods. Open Command Prompt (Windows) or Terminal (Mac/Linux) and run a continuous ping test to a reliable server:
Let this run for 10-15 minutes while using your VPN normally. Watch for connection timeouts or significant latency spikes that might indicate connection instability. Frequent interruptions suggest your VPN isn't maintaining reliable protection, potentially exposing your traffic during brief disconnections. [Screenshot: Terminal showing stable ping results over time]ping -t 8.8.8.8 - Test Multiple Server Locations Repeat steps 4-6 using different VPN server locations to ensure consistent performance across ProtonVPN's network. Connect to servers in at least three different countries and verify that IP address, DNS, and WebRTC tests show appropriate results for each location. This comprehensive testing reveals whether specific servers have issues and helps you identify the most reliable connections for your needs. Inconsistent results across servers might indicate network configuration problems or server-specific issues. [Screenshot: Comparison table showing test results from multiple server locations]
- Verify Long-term Protection Finally, establish ongoing monitoring to ensure your VPN continues working reliably. Set up automated IP checking by bookmarking a simple IP checker and visiting it periodically throughout your browsing sessions. Consider using browser extensions that display your current IP address, making it easy to spot when your VPN disconnects unexpectedly. Regular verification ensures you maintain privacy protection and can quickly identify when your VPN requires troubleshooting or reconnection. [Screenshot: Browser extension showing current VPN IP address in toolbar]
Common Mistakes to Avoid
When testing your VPN connection, several common errors can lead to false confidence in your privacy protection. Here are the most critical mistakes to watch out for:
⚠️ Warning: Only checking your IP address once immediately after connecting to VPN can miss connection drops that expose your real IP later.
**Fix:** Test your IP address multiple times over several hours, especially after periods of network inactivity or when switching between WiFi networks.
⚠️ Warning: Forgetting to test for DNS leaks means your browsing history could be visible to your ISP even with an active VPN connection.
**Fix:** Use dedicated DNS leak testing tools like dnsleaktest.com or ipleak.net, not just basic IP checkers. Verify that all DNS requests show your VPN provider's servers, not your ISP's.
⚠️ Warning: Assuming your VPN is working without testing the kill switch feature can result in unprotected internet access during VPN disconnections.
**Fix:** Intentionally disconnect your VPN while browsing to verify that your internet connection stops completely, confirming the kill switch is properly configured.
⚠️ Warning: Testing only on one device while using the VPN on multiple devices can miss device-specific configuration issues or leaks.
**Fix:** Perform comprehensive tests on every device where you use the VPN, including smartphones, tablets, and different browsers on your computer.
⚠️ Warning: Ignoring WebRTC leaks allows websites to detect your real IP address through your browser, bypassing VPN protection entirely.
**Fix:** Use WebRTC leak testing tools and disable WebRTC in your browser settings, or use browsers with built-in WebRTC protection when privacy is critical.
⚠️ Warning: Not verifying your VPN's logging policy and jurisdiction can mean your data is being collected and potentially shared with authorities despite using encryption.
**Fix:** Research your VPN provider's audit reports, privacy policy, and legal jurisdiction. Consider switching to providers with proven no-logs policies and transparent practices.
## How to Verify Your Setup
Once your VPN is connected, verification is crucial to ensure your privacy and security are actually protected. Several reliable testing methods will confirm whether your VPN is functioning correctly.
**Essential Test Sites**
Start with **ipleak.net**, which provides comprehensive testing for IP address, DNS, and WebRTC leaks in one convenient location. Simply visit the site and check that your displayed IP address matches your VPN server location, not your real location.
Use **dnsleaktest.com** for dedicated DNS leak testing. Click "Extended test" for thorough results. Your DNS servers should belong to your VPN provider or their designated partners, not your ISP.
**whatismyipaddress.com** offers a quick IP verification, while **browserleaks.com** provides advanced testing for WebRTC and other potential privacy leaks.
💡 Pro Tip: Test your VPN from multiple browsers and devices. Some browsers have built-in leak protection that might mask issues present in other applications.
**Interpreting Results**
Successful tests show: your VPN server's IP address (not your real one), DNS servers associated with your VPN provider, and no WebRTC leaks revealing your actual IP.
**Troubleshooting Failed Tests**
If tests reveal leaks, first disconnect and reconnect your VPN. Check your VPN client's settings for DNS leak protection and enable it if available. For WebRTC leaks, disable WebRTC in your browser settings or use browser extensions that block WebRTC requests.
If problems persist, try different VPN servers, update your VPN client, or contact your provider's support team.
💡 Pro Tip: Bookmark these testing sites and run quick checks periodically, especially after software updates or network changes that might affect your VPN configuration.
Troubleshooting Common Issues
VPN Shows Connected But Real IP Address Still Visible
**Problem:** Your VPN client indicates an active connection, but IP leak tests reveal your actual location. **Cause:** DNS leaks or WebRTC vulnerabilities are bypassing the VPN tunnel. **Fix:** 1. Enable DNS leak protection in your VPN settings 2. Disable WebRTC in your browser (type "about:config" in Firefox, set "media.peerconnection.enabled" to false) 3. Restart your browser and retest your IP addressVPN Connection Drops Frequently
**Problem:** Your VPN disconnects randomly, potentially exposing your real IP during browsing. **Cause:** Unstable internet connection, server overload, or missing kill switch feature. **Fix:** 1. Enable the kill switch/network lock feature in your VPN app 2. Switch to a different VPN server location 3. Try changing VPN protocols (OpenVPN to WireGuard or vice versa) 4. Check your internet stability by disconnecting the VPN temporarilySlow Internet Speeds Despite VPN Connection
**Problem:** Dramatically reduced browsing and download speeds when VPN is active. **Cause:** Distance to VPN server, server congestion, or inefficient protocol selection. **Fix:** 1. Connect to a server geographically closer to your location 2. Switch to a faster protocol like WireGuard if available 3. Try different servers in the same region 4. Adjust encryption settings to prioritize speed over maximum securityStreaming Services Block VPN Traffic
**Problem:** Netflix, Hulu, or other platforms display VPN detection errors. **Cause:** Streaming services actively block known VPN IP addresses. **Fix:** 1. Switch to servers specifically optimized for streaming 2. Clear browser cookies and cache 3. Try connecting to different countries where the content is available 4. Contact your VPN provider for updated server recommendationsFrequently Asked Questions
Q: How often should I check if my VPN is working properly?
A: You should test your VPN immediately after connecting and periodically during extended sessions. It's also wise to check after software updates, network changes, or if you notice unusual internet behavior. A quick monthly test ensures your privacy protection remains intact.
Q: What should I do if my VPN is leaking my real IP address?
A: First, disconnect from the internet immediately to prevent further exposure. Try connecting to a different VPN server or restart your VPN client. If leaks persist, contact your VPN provider's support team or consider switching to a more reliable service with better leak protection.
Q: Can websites detect that I'm using a VPN even if it's working correctly?
A: Yes, some websites can identify VPN traffic through various detection methods, even when your VPN isn't leaking. This doesn't mean your VPN is broken—your real IP and location remain hidden. Some premium VPNs offer specialized servers designed to bypass these detection systems.
Q: Why does my internet speed drop significantly when using a VPN?
A: VPNs naturally reduce speed due to encryption overhead and increased routing distance. However, extreme slowdowns may indicate server congestion or poor VPN performance. Try connecting to different servers closer to your location or consider upgrading to a faster VPN service.
Q: Is it normal for my VPN to disconnect occasionally?
A: Occasional disconnections can happen due to network instability, but frequent drops indicate a problem. Quality VPNs include kill switch features to protect you during disconnections. If disconnections occur regularly, check your internet stability or switch VPN providers.
Best VPN for Torrenting: ProtonVPN
Secure Core routes traffic through privacy-friendly countries. Based in Switzerland with strong privacy laws. Open-source and independently audited.
Get ProtonVPN →✓ 30-day money-back guarantee ✓ Works with all torrent clients ✓ Swiss privacy