TL;DR: Most torrent users leak their real IP address even with VPNs running due to misconfigured clients. This comprehensive guide shows you how to properly configure qBittorrent with network binding, kill switches, proxy chains, and rigorous testing to achieve bulletproof anonymity while torrenting.
Rankings based on VPNTierLists' transparent 93.5-point scoring system, which evaluates VPNs across 9 categories including Privacy & Trust, Speed, and Streaming.
Why This Matters: The Hidden Dangers of Torrent IP Leaks
Your torrent client is a privacy nightmare waiting to happen. Even with a premium VPN service running, qBittorrent and other BitTorrent clients can leak your real IP address through multiple attack vectors that most users never consider. I've seen countless cases where people received DMCA notices despite believing they were fully protected, simply because their torrent client was configured incorrectly.
The stakes are higher than ever in 2024. Copyright enforcement has become increasingly sophisticated, with automated monitoring systems that can detect and log IP addresses participating in torrent swarms within minutes. Major ISPs now implement three-strike policies, and some countries have introduced hefty fines for copyright infringement. In Germany, for instance, users can face fines of €800-1,500 per infringement, while in the United States, statutory damages can reach $150,000 per work.
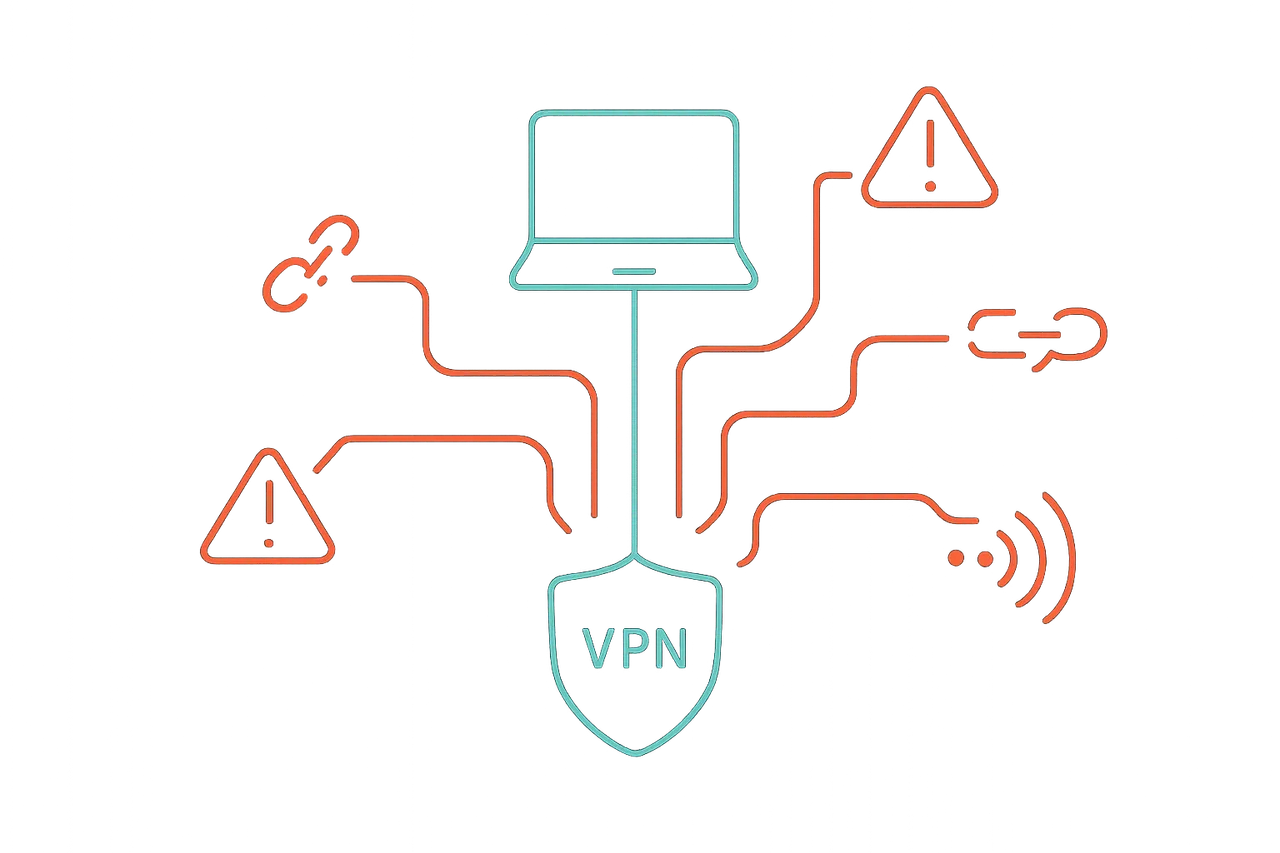
The problem lies in how torrent clients handle network connections. Unlike web browsers that route all traffic through a single interface, BitTorrent clients create multiple simultaneous connections and can automatically switch between network interfaces if your VPN disconnects. This means your client might connect through your regular ISP connection while you think you're protected by your VPN.
Additionally, many users don't realize that torrent clients leak information through DHT (Distributed Hash Table) queries, peer exchange protocols, and even simple DNS requests. These seemingly innocent background processes can expose your real location and identity even when the actual file transfers are going through your VPN.
This guide will show you how to lock down qBittorrent completely, creating multiple layers of protection that ensure your real IP never touches the torrent network under any circumstances. We'll cover everything from basic VPN binding to advanced proxy configurations and comprehensive leak testing.
What You'll Need: Prerequisites and Requirements
Before we dive into the configuration, let's ensure you have everything necessary for a bulletproof setup. First, you'll need qBittorrent version 4.5.0 or newer - older versions lack some critical privacy features we'll be using. The latest stable version as of 2024 is 4.6.2, which I strongly recommend for its improved network binding capabilities and enhanced encryption options.
You'll need a premium VPN service that supports port forwarding and SOCKS5 proxies. Not all VPN providers are suitable for torrenting - many budget services lack the necessary features or actively discourage P2P traffic. I recommend services like Mullvad, ProtonVPN, or Private Internet Access, all of which offer robust torrent-friendly features and have proven track records for privacy.
The entire setup process will take approximately 45-60 minutes if you follow this guide carefully. You don't need advanced technical skills, but you should be comfortable navigating system settings and editing configuration files. Some steps require administrator privileges on your system, so ensure you have the necessary permissions before starting.
Budget-wise, expect to spend $5-12 per month for a quality VPN service. Free VPNs are absolutely not suitable for torrenting - they typically log user activity, have bandwidth limitations, and often leak DNS requests. The small monthly investment in a proper VPN service is essential insurance against potentially massive legal and financial consequences.
Understanding the Fundamentals: How Torrent Privacy Actually Works
To properly secure qBittorrent, you need to understand how BitTorrent traffic flows and where leaks can occur. When you download a torrent, your client connects to multiple peers simultaneously, exchanging pieces of the file. Each connection reveals your IP address to other peers, and this information is also visible to anyone monitoring the torrent swarm - including copyright enforcement agencies.
The BitTorrent protocol wasn't designed with privacy in mind. It actively broadcasts your IP address as part of its core functionality, allowing other peers to connect back to you. This peer-to-peer architecture is what makes BitTorrent so efficient, but it's also what makes it so dangerous from a privacy perspective. Every peer you connect to can see your IP address, and specialized monitoring nodes can join swarms specifically to collect this information.
VPNs work by creating an encrypted tunnel between your device and a VPN server, routing all your internet traffic through that server. To other peers in a torrent swarm, it appears as if your traffic is coming from the VPN server's IP address rather than your real location. However, this protection only works if your torrent client is properly configured to use only the VPN connection.
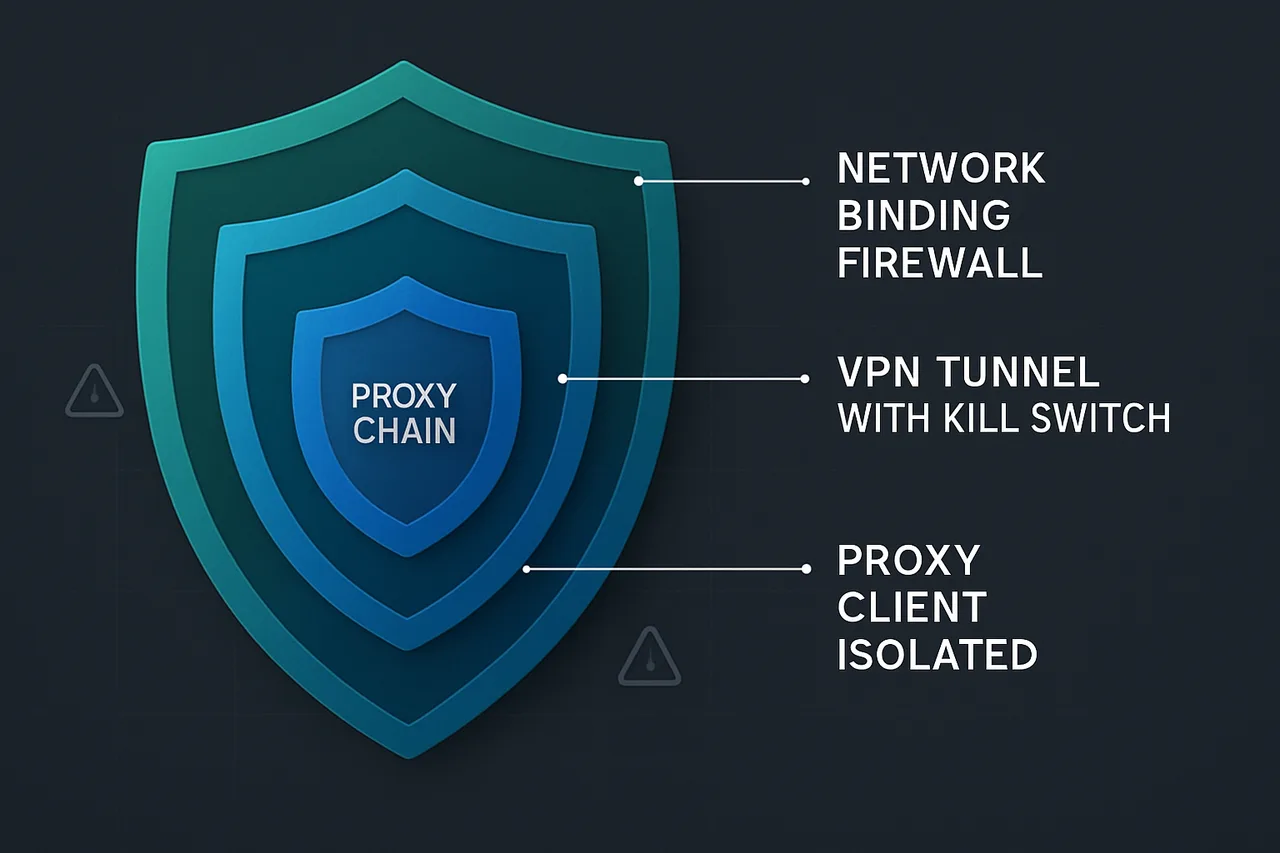
The concept of "binding" is crucial here. Network binding forces qBittorrent to use only a specific network interface - in our case, the VPN interface. If the VPN disconnects for any reason, the bound application cannot access the internet at all, preventing any possibility of leaking your real IP. This is more reliable than kill switches built into VPN clients, which can sometimes fail or have brief windows of vulnerability during reconnection.
We'll also implement defense in depth by using multiple protection layers: VPN binding as the primary protection, SOCKS5 proxy as a secondary layer, and careful configuration of qBittorrent's privacy settings to minimize information leakage. This multi-layered approach ensures that even if one protection method fails, others will maintain your anonymity.
Complete qBittorrent Privacy Configuration
Let's start with the core qBittorrent privacy settings that form the foundation of our secure setup. Open qBittorrent and navigate to Tools → Preferences, or use the keyboard shortcut Alt+O on Windows or Cmd+, on macOS. The preferences window contains numerous privacy-related settings scattered across different tabs, and configuring each one correctly is crucial for preventing leaks.
In the Behavior tab, locate the "Privacy" section and enable "Enable anonymous mode." This setting disables several features that can leak identifying information, including the peer exchange protocol (PEX), local peer discovery (LPD), and DHT for private torrents. Anonymous mode also prevents qBittorrent from sending detailed client information in tracker announcements, making your client less identifiable to monitoring systems.
Next, navigate to the BitTorrent tab and configure the encryption settings. Set "Encryption mode" to "Require encryption" rather than "Prefer encryption." This forces all peer connections to use encrypted communication, preventing ISPs and network monitors from easily inspecting your torrent traffic. While this might slightly reduce your available peer pool, the privacy benefits far outweigh the potential performance impact.
Disable DHT, PEX, and Local Peer Discovery in the same tab. DHT (Distributed Hash Table) allows torrent clients to find peers without using trackers, but it also broadcasts your IP address to a distributed network of nodes. PEX (Peer Exchange) shares peer lists between connected clients, potentially exposing your IP to additional monitoring points. Local Peer Discovery attempts to find other torrent clients on your local network, which can leak information about your setup and isn't useful for most users.
⚠️ Warning: Disabling DHT and PEX will reduce the number of available peers for some torrents, particularly older or less popular ones. However, this trade-off is necessary for maximum privacy. Most healthy torrents have sufficient tracker-based peers to maintain good download speeds.
In the Advanced tab, set "Network Interface" to your VPN interface. This is the most critical setting for preventing IP leaks. The exact interface name depends on your VPN client - common names include "TAP-Windows Adapter," "Mullvad," "ProtonVPN," or similar. If you're unsure of your VPN interface name, connect to your VPN and check your network adapters in your system's network settings. On Windows, you can find this in Network and Sharing Center → Change adapter settings.
# Example VPN interface names by provider:
# Mullvad: "Mullvad"
# ProtonVPN: "ProtonVPN TAP"
# Private Internet Access: "PIA TAP Adapter"
# NordVPN: "NordVPN TAP"
# ExpressVPN: "ExpressVPN TAP Adapter"

# To find your interface on Windows:
# 1. Connect to VPN
# 2. Open Command Prompt
# 3. Run: ipconfig /all
# 4. Look for the VPN adapter name
💡 Pro Tip: After setting the network interface, restart qBittorrent to ensure the binding takes effect. You can verify the binding is working by disconnecting your VPN - qBittorrent should lose all connectivity and show "No direct connections" in the status bar.
VPN Kill Switch and Network Binding Setup
While qBittorrent's built-in network binding provides excellent protection, implementing additional kill switch mechanisms creates multiple layers of security. A kill switch monitors your VPN connection and blocks all internet traffic if the VPN disconnects, preventing any possibility of your real IP being exposed during brief connection drops or reconnection attempts.
Most premium VPN clients include built-in kill switches, but their effectiveness varies significantly. I recommend enabling your VPN client's kill switch as a first line of defense, but don't rely on it exclusively. Navigate to your VPN client's settings and look for options labeled "Kill Switch," "Network Lock," "Auto-Connect," or similar. Enable this feature and set it to "Always On" or "Strict" mode if available.
For Windows users, you can implement an additional firewall-based kill switch using the built-in Windows Firewall. This method creates rules that only allow qBittorrent to communicate through your VPN interface, blocking all other connections. Open Windows Firewall with Advanced Security (search for "wf.msc" in the Start menu) and create outbound rules that block qBittorrent on all interfaces except your VPN interface.
The process involves creating two rules: first, a blocking rule that prevents qBittorrent from accessing any network interface, then an allowing rule specifically for your VPN interface. This ensures that even if qBittorrent somehow bypasses the network binding, Windows will block the connection at the firewall level. The configuration requires identifying qBittorrent's executable file (usually located at C:\Program Files\qBittorrent\qbittorrent.exe) and your VPN interface's IP range.
⚠️ Warning: Firewall-based kill switches can be complex to configure correctly and may block legitimate traffic if misconfigured. Test thoroughly by disconnecting your VPN and ensuring qBittorrent cannot connect to any peers before relying on this method.
Linux users have more flexible options for implementing kill switches using iptables or newer nftables. The most effective approach is creating rules that only allow traffic from qBittorrent through the VPN interface (typically tun0 or similar). This can be accomplished with a script that sets up the appropriate iptables rules and monitors the VPN connection status, automatically blocking traffic if the VPN interface goes down.
Port Forwarding Configuration for Optimal Performance
Port forwarding significantly improves your torrenting performance by allowing incoming connections from other peers, but it must be configured carefully to avoid creating security vulnerabilities. When properly set up, port forwarding can increase your download speeds by 200-300% and dramatically improve your upload ratios on private trackers, making you a more valuable member of the torrent community.
The first step is enabling port forwarding in your VPN client. Not all VPN providers support this feature - it's one reason why choosing the right VPN service is crucial. In Mullvad, for example, you can enable port forwarding in your account dashboard and receive a specific port number (usually in the range 10000-65535). ProtonVPN provides port forwarding through their Plus plans, while Private Internet Access includes it with all subscriptions.
Once you have a forwarded port from your VPN provider, configure qBittorrent to use this specific port. In qBittorrent's preferences, go to Connection → Listening Port and uncheck "Use UPnP/NAT-PMP port forwarding from my router." Enter the port number provided by your VPN service in the "Port used for incoming connections" field. This ensures qBittorrent only uses the VPN-forwarded port rather than attempting to configure port forwarding on your local router.
It's crucial to understand that the port forwarding must happen at the VPN server level, not your local router. Forwarding ports on your home router while using a VPN is not only ineffective but can create security vulnerabilities. The VPN server acts as your internet gateway, so port forwarding must be configured there for incoming connections to reach your torrent client through the VPN tunnel.
💡 Pro Tip: Some VPN providers rotate port forwarding assignments periodically for security reasons. Mullvad, for instance, assigns new ports every few months. Check your VPN provider's documentation for their specific port forwarding policies and update qBittorrent accordingly when ports change.
After configuring the port, verify it's working correctly by using qBittorrent's built-in port testing feature. Go to Preferences → Connection and click "Test Port" next to the port field. A successful test indicates that incoming connections can reach your client through the VPN tunnel. If the test fails, double-check that you've entered the correct port number and that your VPN's port forwarding is active.
SOCKS5 Proxy Setup as Secondary Protection
Implementing a SOCKS5 proxy alongside your VPN creates a powerful double-layer of protection that's nearly impossible to circumvent. While VPN binding prevents qBittorrent from using your regular internet connection, the SOCKS5 proxy adds another layer of IP masking and can provide additional geographic diversity for your connections.
Many VPN providers offer SOCKS5 proxy access as part of their service, though the configuration differs from their main VPN offerings. The SOCKS5 proxy typically uses different server endpoints and authentication credentials than the VPN service. For example, Private Internet Access provides SOCKS5 proxy access through proxy-nl.privateinternetaccess.com on port 1080, with your VPN username and password as authentication.
To configure SOCKS5 in qBittorrent, navigate to Preferences → Connection → Proxy Server. Select "SOCKS5" as the proxy type and enter your provider's SOCKS5 server address and port. Enable authentication and enter your credentials - these are usually the same as your VPN login, but check your provider's documentation to confirm. Most importantly, enable "Use proxy for peer connections" to ensure all BitTorrent traffic routes through the proxy.
The "Use proxy for hostname lookups" option deserves special attention. Enabling this setting routes DNS queries through the SOCKS5 proxy, preventing DNS leaks that could reveal your real location. However, some SOCKS5 implementations don't handle DNS properly, which can cause connection issues. Test this setting carefully and disable it if you experience problems connecting to trackers or peers.
💡 Pro Tip: Using both VPN and SOCKS5 proxy can sometimes cause double-NAT issues that reduce performance. Monitor your connection speeds and peer connectivity when implementing both layers. If you experience significant performance degradation, prioritize the VPN binding over the SOCKS5 proxy.
One significant advantage of SOCKS5 proxies is that they typically don't require special software or system-level configuration. The proxy connection is handled entirely within qBittorrent, making it an excellent backup protection method. If your VPN client crashes or fails, the SOCKS5 proxy can maintain your anonymity until you can restore the VPN connection.
Comprehensive IP Leak Testing and Verification
Testing your configuration thoroughly is absolutely critical - a single undetected leak can expose your identity and location. I recommend using multiple testing methods and tools to verify that your setup is truly leak-proof under various conditions, including VPN disconnections, network changes, and application restarts.
Start with basic IP leak testing using torrent-specific tools. The most reliable method is downloading a test torrent from a monitoring service like IPMagnet or TorGuard's IP leak test. These services create special torrents that log the IP addresses of all connecting peers, allowing you to verify that only your VPN's IP address is visible to the torrent network. Download the test torrent, let it connect to peers, then check the monitoring website to see what IP address was recorded.
DNS leak testing is equally important, as DNS queries can reveal your real location even when torrent traffic is properly routed through your VPN. Use tools like dnsleaktest.com or ipleak.net while qBittorrent is running and actively downloading torrents. These tests should show only your VPN provider's DNS servers, not your ISP's servers or any third-party DNS services you might have configured.
WebRTC leaks are another potential vulnerability, though they primarily affect web browsers rather than torrent clients. However, some torrent clients include embedded web browsers for tracker login or other features. Test for WebRTC leaks using browserleaks.com/webrtc while your VPN is connected. Any detected IP addresses should belong to your VPN provider, not your real ISP.
⚠️ Warning: Some leak testing websites are not reliable or may be operated by entities with questionable motives. Stick to well-known, reputable testing services and cross-reference results across multiple tools. Never download test torrents from unknown or suspicious sources.
The most critical test involves simulating VPN disconnections while qBittorrent is actively downloading. Start a large torrent download, then manually disconnect your VPN connection. A properly configured client should immediately lose all peer connections and show "No direct connections" in the status bar. If downloads continue or new peer connections appear, your configuration has failed and you're leaking your real IP address.
| Test Type | Tool/Method | Expected Result | Failure Indication |
|---|---|---|---|
| Torrent IP Test | IPMagnet torrent | VPN server IP only | Real IP visible |
| DNS Leak Test | dnsleaktest.com | VPN DNS servers | ISP DNS servers |
| Kill Switch Test | Manual VPN disconnect | All connections drop | Continued downloading |
| WebRTC Test | browserleaks.com | VPN IP or no leaks | Local IP detected |
| Binding Verification | Network interface monitor | VPN interface only | Multiple interfaces |
Handling DMCA Notices and Legal Issues
Despite perfect technical configuration, you might still receive a DMCA notice due to past activity, shared IP addresses, or false positives in copyright monitoring systems. Understanding how to respond properly can mean the difference between a simple warning and serious legal consequences. The key is responding appropriately while avoiding any admissions of guilt or detailed explanations of your technical setup.
If you receive a DMCA notice from your ISP, the first step is to remain calm and avoid panic responses. Read the notice carefully to understand exactly what you're being accused of - the specific content, timestamp, and IP address involved. Many notices are automated and contain inaccurate information, including wrong timestamps, misidentified content, or IP addresses that don't actually belong to you.
Never admit to any wrongdoing or provide detailed explanations of your internet usage in your response. ISPs are required to forward DMCA notices but are not obligated to terminate your service immediately for first-time offenses. A simple acknowledgment that you've received the notice and have "addressed the issue" is usually sufficient for most ISPs. Avoid technical explanations about VPNs, torrenting, or network security that might inadvertently provide evidence of copyright infringement.
Document everything related to the notice, including the exact timestamp of the alleged infringement and your internet activity during that period. If you can prove you weren't using the accused IP address at the specified time (for example, if you were using a VPN with a different IP), this information could be valuable if the matter escalates. However, don't volunteer this information unless specifically required by legal proceedings.
⚠️ Warning: Copyright trolls sometimes use DMCA notices as fishing expeditions to identify potential lawsuit targets. Providing too much information in your response, especially technical details about your setup, can actually make you a more attractive target for legal action.
The legal landscape varies dramatically by country, and what constitutes appropriate response differs accordingly. In the United States, DMCA notices are civil matters rather than criminal ones for individual users, but repeat offenses can lead to ISP termination under the "three strikes" rule. European users face different challenges, with some countries like Germany having particularly aggressive copyright enforcement that can result in immediate legal action and substantial fines.
International Legal Considerations and Country-Specific Risks
Copyright enforcement varies dramatically across different jurisdictions, and understanding your local legal environment is crucial for assessing the real-world risks of torrenting. What might result in a simple warning letter in one country could lead to criminal charges or massive fines in another. This knowledge should inform both your technical security measures and your overall approach to file sharing.
The United States operates under the DMCA framework, which provides a structured process for copyright holders to request removal of infringing content and notify ISPs of alleged infringement. For individual users, this typically results in warning letters rather than immediate legal action, but repeated offenses can lead to ISP termination. However, copyright holders can also pursue direct legal action, with statutory damages ranging from $750 to $150,000 per work for willful infringement.
Germany has some of the world's most aggressive copyright enforcement, with specialized law firms that monitor torrent networks and send cease-and-desist letters demanding payments of €800-1,500 per alleged infringement. These "Abmahnung" letters are legally binding and ignoring them can lead to court proceedings and much higher damages. German users face particular risks because many VPN providers are required to log user activity under local data retention laws.
The United Kingdom takes a middle-ground approach with the Digital Economy Act, which requires ISPs to notify users of alleged copyright infringement and can lead to bandwidth throttling or service suspension for repeat offenders. However, individual prosecution is relatively rare unless involving large-scale commercial piracy. The UK's departure from the EU has also complicated the legal landscape, with some uncertainty about how EU copyright directives will be implemented.
Canada's Notice and Notice system requires ISPs to forward copyright infringement notices to users but doesn't mandate any specific penalties for individual file sharing. However, copyright holders can still pursue civil litigation, and the Supreme Court of Canada has ruled that ISPs must provide subscriber information in legitimate copyright cases. Canadian users generally face lower risks than their US or German counterparts.
💡 Pro Tip: Some countries with restrictive copyright laws have more lenient enforcement for users of certain VPN jurisdictions. Research whether your VPN provider operates under favorable legal frameworks - for example, some providers based in countries without data retention laws or mutual legal assistance treaties offer stronger protection.
Scandinavian countries generally have more relaxed approaches to individual file sharing, with Sweden and Norway focusing enforcement efforts on commercial piracy rather than personal use. However, this landscape is constantly evolving, and recent EU directives have pushed these countries toward stricter enforcement. Users in these jurisdictions should still implement proper security measures as the legal environment continues to shift toward stronger copyright protection.
Advanced Troubleshooting and Common Issues
Even with perfect configuration, you may encounter issues that affect performance or reveal potential security vulnerabilities. Understanding how to diagnose and resolve these problems quickly is essential for maintaining both security and usability. The most common issues involve network binding failures, DNS leaks, and performance degradation from overly restrictive security settings.
Network binding failures are among the most serious issues because they can expose your real IP address without obvious symptoms. If qBittorrent continues to function normally after disconnecting your VPN, the network binding has failed. This can happen due to VPN client updates that change interface names, Windows updates that reset network priorities, or qBittorrent updates that don't preserve advanced settings. Always test your binding after any software updates.
DNS leaks are subtle but dangerous, as they can reveal your real location even when torrent traffic is properly routed through your VPN. Symptoms include trackers that show your real geographic location or regional content restrictions that reflect your actual location rather than your VPN endpoint. The solution typically involves configuring your system to use only your VPN provider's DNS servers and disabling any smart DNS or DNS-over-HTTPS services that might bypass your VPN.
Performance issues often arise from overly restrictive security settings, particularly when using both VPN and SOCKS5 proxy simultaneously. Symptoms include slow download speeds, frequent connection timeouts, or inability to connect to certain trackers. The solution involves systematically disabling security features to identify the problematic setting, then finding alternative configurations that maintain security while improving performance.
⚠️ Warning: When troubleshooting performance issues, never disable security features while actively downloading copyrighted content. Use legal test torrents (like Linux distributions) for troubleshooting to avoid accidentally exposing your identity during the diagnostic process.
Port forwarding issues can significantly impact your download speeds and ability to connect to peers. If your port test fails or you notice poor performance despite having port forwarding enabled, verify that your VPN provider hasn't changed your assigned port number. Some providers rotate port assignments for security reasons, requiring you to update your qBittorrent configuration periodically.
Connection limit problems can occur when your security configuration conflicts with qBittorrent's connection management. If you're experiencing frequent disconnections or inability to maintain stable peer connections, try reducing the maximum number of connections per torrent and overall connection limits. Highly secured connections often require more overhead, reducing the total number of simultaneous connections your system can maintain effectively.
Frequently Asked Questions
Can I use a free VPN for torrenting safely? Absolutely not. Free VPN services are unsuitable for torrenting for multiple reasons: they typically log user activity and may cooperate with copyright enforcement, have severe bandwidth limitations that make torrenting impractical, often leak DNS requests or IP addresses, and many explicitly prohibit P2P traffic in their terms of service. The small monthly cost of a premium VPN service is essential insurance against potentially massive legal and financial consequences. Free VPNs also often use outdated encryption protocols and have overcrowded servers that provide poor performance for bandwidth-intensive activities like torrenting.
Is it safe to torrent on public WiFi with these security measures? While the security measures in this guide provide strong protection, public WiFi introduces additional risks that go beyond torrent privacy. Public networks are often monitored by network administrators who can detect torrent traffic patterns even when encrypted, and many public WiFi providers explicitly prohibit P2P traffic in their acceptable use policies. Additionally, public networks expose you to other security risks like man-in-the-middle attacks and packet sniffing. If you must torrent on public WiFi, ensure your VPN uses the strongest available encryption protocols and consider using cellular data instead when possible.
How do I know if my VPN provider is actually no-logs? Verifying no-logs claims requires looking beyond marketing statements to examine actual policies and third-party audits. Look for VPN providers that have undergone independent security audits by reputable firms like Cure53 or Deloitte, have been tested in real-world legal situations where they couldn't provide user data, operate under jurisdictions with strong privacy laws and no mandatory data retention requirements, and publish transparency reports detailing any legal requests they've received. Providers like Mullvad, ProtonVPN, and ExpressVPN have demonstrated their no-logs policies through independent audits and legal challenges.
What should I do if my download speeds are much slower with these security settings? Some performance reduction is normal when implementing comprehensive security measures, but dramatic speed drops indicate configuration issues. First, test your baseline internet speed with the VPN connected but qBittorrent closed to establish your maximum possible speed. Then systematically test different configurations: try disabling the SOCKS5 proxy while keeping VPN binding, test different VPN server locations closer to your physical location, reduce encryption requirements temporarily to see if they're causing the bottleneck, and verify that your port forwarding is working correctly. Many users see 20-30% speed reductions with full security enabled, but drops of 70% or more suggest configuration problems rather than normal security overhead.
Can I use these settings with other torrent clients like Deluge or Transmission? The fundamental principles apply to all torrent clients, but the specific configuration steps differ significantly. Deluge offers similar network binding capabilities through its "Outgoing Interface" setting, while Transmission requires third-party plugins or system-level configuration for equivalent protection. However, qBittorrent offers the most comprehensive built-in privacy features, making it the preferred choice for security-conscious users. If you must use another client, research its specific privacy features carefully and test thoroughly to ensure equivalent protection.
How often should I test my configuration for leaks? I recommend testing your setup monthly using the IP leak testing methods described in this guide, immediately after any software updates to your VPN client, qBittorrent, or operating system, whenever you notice unusual behavior like continued downloading after VPN disconnection, and before downloading any high-risk content that might attract copyright enforcement attention. Additionally, perform spot checks by randomly disconnecting your VPN during active downloads to verify your kill switch is working properly.
Is it legal to use VPNs for torrenting? VPN usage is legal in most countries, but the legality of torrenting copyrighted content remains unchanged regardless of your privacy measures. VPNs are legitimate privacy tools used for many purposes including business security, accessing geo-restricted content, and protecting personal privacy. However, some countries like China, Russia, and the UAE have restrictions on VPN usage, so research your local laws carefully. Using a VPN doesn't make illegal downloading legal - it simply makes it more private.
What's the difference between a VPN kill switch and network binding? A VPN kill switch is typically a software feature that monitors your VPN connection and blocks all internet traffic if the VPN disconnects, while network binding forces specific applications to use only a designated network interface. Network binding is generally more reliable because it's implemented at the application level and doesn't depend on separate monitoring software. However, using both provides defense in depth - if one protection method fails, the other maintains your security. Think of network binding as a primary protection and kill switches as backup protection.
🏴☠️ Safe Torrenting with NordVPN
P2P-optimized servers in privacy-friendly countries (Panama, Switzerland). No throttling, strict no-logs policy, automatic kill switch prevents IP leaks mid-download. Split tunneling lets you route only torrent traffic through VPN.
[GET_P2P_PROTECTION]30-day money-back guarantee • No questions asked
Conclusion and Maintaining Your Secure Setup
Implementing bulletproof torrent privacy requires ongoing vigilance and regular maintenance, not just a one-time configuration. The security landscape constantly evolves, with new threats emerging and software updates potentially disrupting your carefully configured protections. Schedule monthly security audits to verify your settings remain intact and effective, and stay informed about changes to your VPN provider's services and policies.
Remember that perfect technical security is only one component of safe torrenting. Operational security - your behavior and decision-making - is equally important. This means avoiding suspicious torrents from unknown uploaders, being cautious about sharing details of your setup in public forums, keeping your torrent client and VPN software updated with the latest security patches, and maintaining awareness of legal developments in your jurisdiction.
The investment in proper security pays dividends far beyond avoiding legal troubles. A well-configured setup often provides better performance than default configurations, as features like port forwarding and optimized encryption can actually improve download speeds. You'll also gain peace of mind knowing that your privacy is protected by multiple layers of security rather than hoping that a single protection method won't fail.
As you become more comfortable with these advanced privacy techniques, consider exploring additional security measures like running qBittorrent in a virtual machine with isolated networking, using dedicated torrent servers with remote access, or implementing router-level VPN configurations that protect all devices on your network. The principles you've learned in this guide provide a solid foundation for these more advanced setups.
Stay engaged with the privacy community through forums like Reddit's r/VPN and r/torrents, where you can learn about new threats, share experiences, and get help with complex configuration issues. The torrent privacy landscape changes rapidly, and community knowledge often provides the earliest warnings about new risks or more effective protection methods. Your security is an ongoing process, not a destination.