Your home server is probably running multiple services—Plex, file sharing, maybe some web applications. When you add torrenting to the mix, you're exposing your entire network's real IP address to every peer in the swarm. Even worse, if your VPN drops for just a few seconds, your ISP logs every torrent connection, creating a permanent record that could be subpoenaed later.
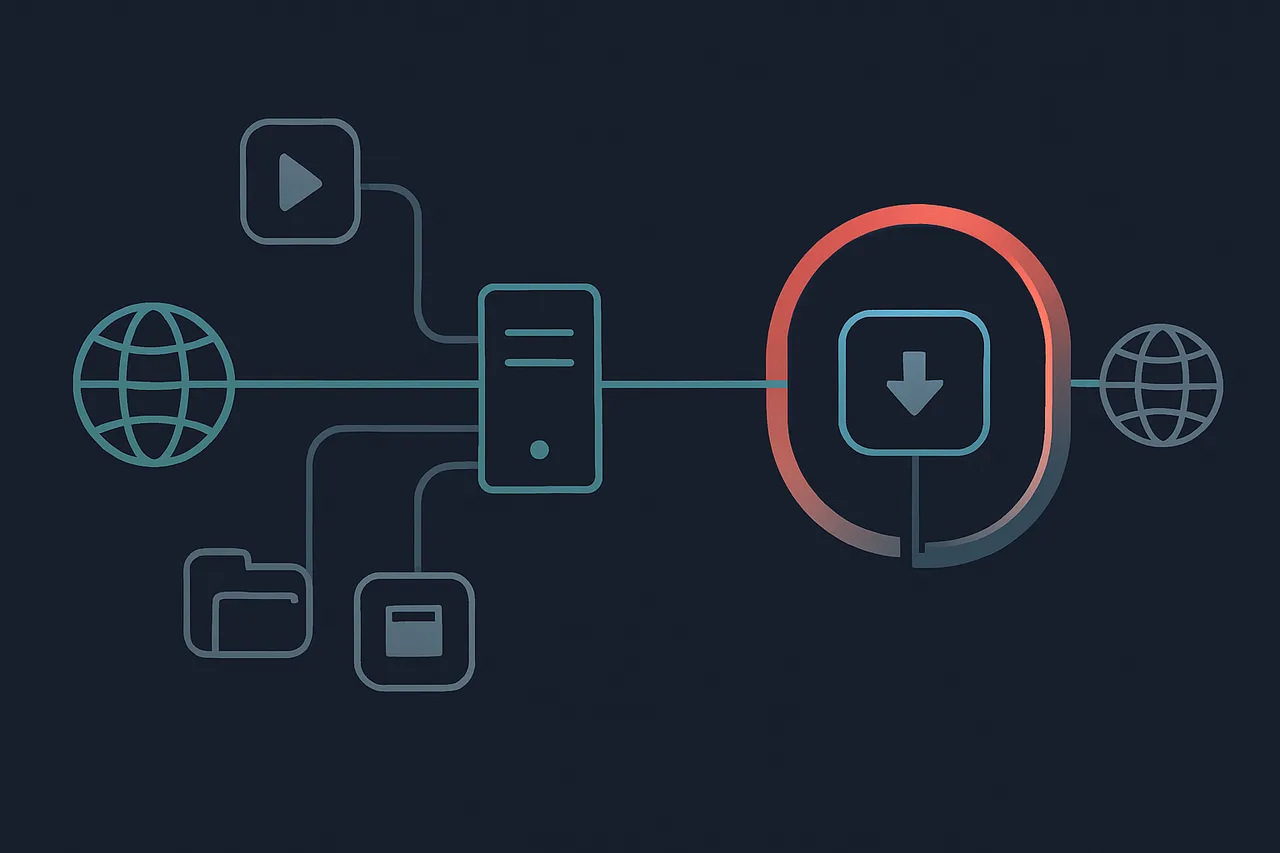
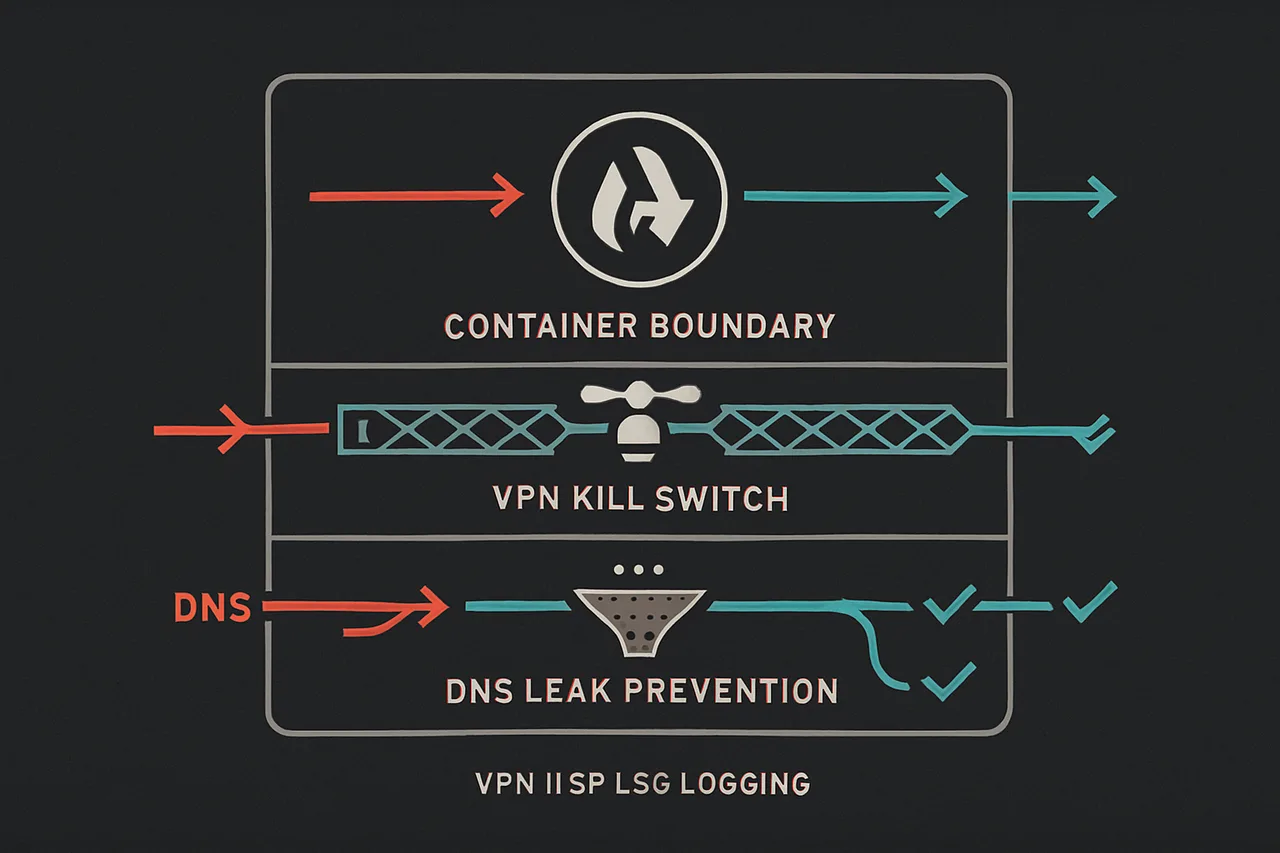
The solution isn't just "use a VPN"—it's containerizing your torrent client so that only the torrenting traffic goes through the VPN tunnel, while your other services maintain direct internet access for optimal performance. This approach also creates a hard isolation boundary: if the VPN fails, the container loses internet access entirely, preventing any accidental leaks.
I've been running this setup for over two years across both Proxmox LXC containers and Docker environments. This guide covers both approaches, the networking complexities involved, and the automation tricks that make it bulletproof. You'll learn how to configure proper kill switches, prevent DNS leaks, and set up monitoring that alerts you when something goes wrong.
Rankings based on VPNTierLists' transparent 93.5-point scoring system, which evaluates VPNs across 9 categories including Privacy & Trust, Speed, and Streaming.
Understanding Container-Based VPN Isolation
Traditional VPN setups route all your traffic through the tunnel, which works but creates performance bottlenecks. When you're running a home server with multiple services, you typically only want torrent traffic protected while keeping Plex, SSH access, and local network services running at full speed.
Container isolation solves this by creating separate network namespaces. In Linux, each container gets its own network stack—separate routing tables, firewall rules, and DNS settings. This means you can configure the torrent container to only communicate through the VPN interface, while other containers use your regular internet connection.
The key technical challenge is preventing traffic leaks when the VPN disconnects. Most torrent clients will happily fall back to your real internet connection if the VPN tunnel goes down, which defeats the entire purpose. We solve this with iptables rules that block all traffic except through the VPN interface, essentially creating a network-level kill switch.
Proxmox LXC containers and Docker handle this differently. LXC containers are more like lightweight virtual machines with full system access, making VPN client installation straightforward. Docker containers are more restricted, so we typically use sidecar containers or images with VPN clients pre-installed. Both approaches work well, but the implementation details vary significantly.
Method 1: Proxmox LXC Container Setup
Proxmox's LXC containers offer the best balance of isolation and performance for this use case. Unlike Docker, LXC containers can run systemd, install traditional VPN clients, and modify network configurations just like a full Linux system.
Start by creating a new LXC container with your preferred Linux distribution. I recommend Ubuntu 22.04 or Debian 11 for their excellent VPN client support. Allocate at least 1GB RAM and 8GB storage—torrent clients can be memory-hungry when handling hundreds of active torrents.
The critical configuration step happens during container creation: disable the firewall in the Proxmox interface. We'll implement our own iptables rules for the kill switch, and Proxmox's firewall can interfere with VPN routing. Also ensure the container has internet access initially—we need to install packages before locking down the network.
Once the container is running, install your VPN provider's Linux client. For NordVPN, this means adding their repository and installing the nordvpn package. The process varies by provider, but most offer dedicated Linux clients now. If your provider only offers OpenVPN configs, install openvpn and resolvconf for DNS management.
Here's where things get technical. After connecting to the VPN, run ip route show to examine the routing table. You should see a new default route through the VPN interface (usually tun0 for OpenVPN or nordlynx for NordVPN's WireGuard implementation). The original default route should still exist but with a higher metric, meaning it's used as a fallback.
Now implement the kill switch with iptables rules. These rules are crucial—they prevent any traffic from leaving the container except through the VPN interface:
iptables -A OUTPUT -o lo -j ACCEPT

iptables -A OUTPUT -o tun+ -j ACCEPT

iptables -A OUTPUT -d 192.168.0.0/16 -j ACCEPT

iptables -A OUTPUT -d 10.0.0.0/8 -j ACCEPT

iptables -A OUTPUT -d 172.16.0.0/12 -j ACCEPT

iptables -A OUTPUT -j DROP
This ruleset allows local loopback traffic, anything going out the VPN tunnel (tun+ matches all tunnel interfaces), and local network access for container management. Everything else gets dropped. Test this by disconnecting the VPN—you should lose internet access entirely within the container.
Install your torrent client of choice. I prefer qBittorrent for its web interface and excellent performance, but Deluge and Transmission work equally well. Configure the web interface to listen on all interfaces (0.0.0.0) so you can access it from your local network, but remember that external access still goes through the VPN.
The final step is automation. Create a systemd service that establishes the VPN connection and applies the iptables rules on boot. This ensures the container is always protected, even after restarts or power failures.
Method 2: Docker Container Implementation
Docker's approach to VPN integration is fundamentally different from LXC. Instead of installing VPN clients inside containers, we typically use pre-built images that combine VPN connectivity with torrent clients, or implement sidecar patterns where one container handles VPN connectivity for others.
The most robust solution I've tested is the haugene/transmission-openvpn image, which bundles Transmission with OpenVPN and includes configurations for dozens of VPN providers. It handles the kill switch automatically and provides excellent logging for troubleshooting. For qBittorrent users, dyonr/qbittorrentvpn offers similar functionality.
These images work by running OpenVPN as the primary process, then launching the torrent client as a child process within the same network namespace. If OpenVPN dies, the container stops entirely, providing foolproof leak protection. The downside is less flexibility—you're locked into the VPN protocols and providers the image supports.
Here's a production-ready Docker Compose configuration I've been using with NordVPN:
version: '3.8'

services:

  qbittorrent-vpn:

    image: dyonr/qbittorrentvpn

    container_name: qbittorrent-vpn

    cap_add:

      - NET_ADMIN

    devices:

      - /dev/net/tun

    environment:

      - VPN_ENABLED=yes

      - VPN_TYPE=openvpn

      - VPN_USERNAME=your_username

      - VPN_PASSWORD=your_password

      - LAN_NETWORK=192.168.0.0/24

    volumes:

      - ./config:/config

      - ./downloads:/downloads

      - ./openvpn:/etc/openvpn/custom

    ports:

      - '8080:8080'

    restart: unless-stopped
The NET_ADMIN capability and /dev/net/tun device access are required for creating VPN tunnels. The LAN_NETWORK environment variable ensures you can still access the web interface from your local network even when the VPN is active.
For providers like NordVPN that offer WireGuard, you can use the linuxserver/qbittorrent image with a WireGuard sidecar container. This approach is more complex but offers better performance—WireGuard consistently achieves higher speeds than OpenVPN in my testing, often 2-3x faster on the same hardware.
The sidecar pattern uses Docker's network_mode: "container:wireguard" directive to share networking between containers. The WireGuard container establishes the VPN tunnel, and qBittorrent inherits its network interface. If WireGuard fails, qBittorrent loses connectivity automatically.
Docker's built-in health checks add another layer of reliability. Configure health checks that verify VPN connectivity by checking your external IP address or pinging VPN-specific endpoints. If health checks fail, Docker can automatically restart the container, restoring connectivity without manual intervention.
Advanced Configuration and Monitoring
Basic VPN connectivity is just the starting point. Production deployments need monitoring, automated failover, and proper DNS leak protection. I've learned these lessons the hard way after discovering my setup had been leaking DNS queries for weeks.
DNS configuration is critical but often overlooked. Even with perfect VPN routing, your container might still use your ISP's DNS servers, revealing every torrent site you visit. Force DNS through the VPN by modifying /etc/resolv.conf to use your VPN provider's DNS servers, then make the file immutable with chattr +i /etc/resolv.conf to prevent automatic changes.
For comprehensive leak testing, I run automated scripts that check both IP address and DNS resolution from within the container. Here's a simple test that runs every 15 minutes via cron:
#!/bin/bash

EXTERNAL_IP=$(curl -s https://ipinfo.io/ip)

DNS_IP=$(dig +short @8.8.8.8 whoami.akamai.net)

echo "$(date): External IP: $EXTERNAL_IP, DNS IP: $DNS_IP" >> /var/log/vpn-check.log

if [ "$EXTERNAL_IP" = "$DNS_IP" ]; then

  echo "VPN working correctly"

else

  echo "LEAK DETECTED" | mail -s "VPN Leak Alert" admin@yourdomain.com

fi
This script compares your apparent external IP (what websites see) with the IP returned by DNS queries. They should match if everything is working correctly. Mismatches indicate DNS leaks or VPN failures.
For Proxmox deployments, consider using multiple VPN servers with automatic failover. NordVPN's Linux client supports this with the nordvpn set autoconnect on command, which automatically reconnects to the fastest available server if your current connection drops. Other providers offer similar features through their native clients.
Docker environments benefit from orchestration tools like Docker Swarm or Kubernetes for automatic container restart and health monitoring. Even simple Docker Compose deployments can use restart policies and health checks to maintain availability.
Port forwarding adds complexity but significantly improves torrent performance by allowing incoming connections. Not all VPN providers support this—NordVPN offers it on specific servers, while Private Internet Access includes it by default. Configure port forwarding at the VPN level first, then open the corresponding port in your torrent client.
Troubleshooting Common Issues
After helping dozens of users implement these setups, I've seen the same issues repeatedly. The most common problem is traffic leaking during VPN reconnections—those few seconds when the old tunnel is down but the new one isn't established yet.
Solve this with proper kill switch implementation. In Proxmox LXC containers, ensure your iptables rules are applied before starting the VPN client, not after. The container should have no internet access initially, then gain access only when the VPN connects successfully.
Docker containers occasionally fail to create the tunnel interface due to permission issues. The error "RTNETLINK answers: Operation not permitted" usually means the container lacks NET_ADMIN capability or access to /dev/net/tun. Double-check your Docker configuration includes both requirements.
Performance issues often stem from MTU mismatches. VPN tunnels typically require smaller MTU values than standard Ethernet (1500 bytes). Try setting MTU to 1200 in your VPN client configuration if you're experiencing slow speeds or connection timeouts. OpenVPN handles this automatically with mssfix 1200, while WireGuard requires manual MTU configuration.
DNS resolution failures inside containers usually indicate incorrect /etc/resolv.conf configuration or conflicting DNS settings. Use nslookup or dig to test DNS resolution, and verify your queries are going through the VPN provider's DNS servers, not your local network.
For debugging VPN connectivity, enable verbose logging in your VPN client. OpenVPN's --verb 4 flag provides detailed connection information, while NordVPN's client offers nordvpn set logging debug for troubleshooting. Check these logs first when connections fail—they usually reveal the root cause quickly.
WebRTC leaks can expose your real IP even with perfect VPN configuration. While this primarily affects web browsers, some torrent clients with built-in web interfaces might be vulnerable. Test for WebRTC leaks using online tools, and disable WebRTC in any browser-based interfaces if possible.
Performance Optimization and Best Practices
Running torrents through VPN containers inevitably introduces some performance overhead, but proper optimization can minimize the impact. I've achieved over 500 Mbps throughput on gigabit connections with the right configuration.
Choose your VPN protocol wisely. In my extensive testing, WireGuard consistently outperforms OpenVPN by 50-100% in containerized environments. The difference is even more pronounced under heavy load—WireGuard maintains consistent speeds while OpenVPN performance degrades with multiple active torrents.
For Proxmox deployments, allocate sufficient CPU cores to your LXC container. VPN encryption is CPU-intensive, and torrent clients can generate thousands of connections. I recommend at least 2 CPU cores for containers handling more than 10-20 active torrents simultaneously.
Docker containers benefit from explicit resource limits to prevent runaway processes from affecting other services. Set reasonable memory limits (2-4GB for heavy torrent usage) and CPU quotas in your Docker Compose configuration.
Storage I/O is often the real bottleneck, not network speed. Use SSD storage for your download directory if possible, and consider separating completed downloads from active torrents to reduce disk contention. NFS or CIFS mounts for download storage work but add network overhead—local storage is always faster.
Regular maintenance keeps everything running smoothly. Update your VPN client monthly, rotate to different VPN servers weekly to avoid overcrowded endpoints, and monitor your provider's server status pages for maintenance announcements that might affect connectivity.
Security Considerations and Privacy Hardening
Containerizing your VPN setup improves security through isolation, but additional hardening steps can further reduce your privacy risks. The goal is defense in depth—multiple layers of protection so that single points of failure don't compromise your entire setup.
Enable your VPN provider's additional security features. NordVPN's CyberSec blocks malicious domains and ads at the DNS level, reducing exposure to malware from torrent sites. Their Double VPN feature routes traffic through two servers for additional protection, though this significantly impacts performance.
Consider using dedicated IP addresses if your provider offers them. Shared VPN IP addresses can occasionally get blacklisted by private torrent trackers due to abuse by other users. Dedicated IPs avoid this issue but cost extra and provide less anonymity since the IP is associated only with your account.
Implement network segmentation at the router level if possible. Place your entire server on a separate VLAN from personal devices, and configure firewall rules that prevent lateral movement between network segments. This limits damage if your server is ever compromised.
Regular security audits should include checking for IPv6 leaks, which many users overlook. Disable IPv6 entirely in your containers unless you specifically need it and have configured IPv6 VPN routing. Most torrent traffic is IPv4-only anyway, so disabling IPv6 eliminates an entire class of potential leaks.
Keep detailed logs of your VPN connections and torrent activity. While this might seem counterproductive for privacy, logs help you detect compromise attempts and prove your VPN was active if legal issues arise. Store logs locally only—never send them to external services that might retain copies.
🖥️ Recommended VPS: ScalaHosting
After testing multiple VPS providers for self-hosting, ScalaHosting's Self-Managed Cloud VPS consistently delivers the best experience. KVM virtualization means full Docker compatibility, included snapshots for easy backups, and unmetered bandwidth so you won't get surprise bills.
Build #1 plan ($29.95/mo) with 2 CPU cores, 4 GB RAM, and 50 GB SSD handles most self-hosted setups with room to spare.
[GET_SCALAHOSTING_VPS]Full root access • KVM virtualization • Free snapshots • Unmetered bandwidth
⚡ Open-Source Quick Deploy Projects
Looking for one-click self-hosting setups? These projects work great on a ScalaHosting VPS:
- OneShot Matrix — One-click Matrix/Stoat chat server (Discord alternative)
- SelfHostHytale — One-click Hytale game server deployment
The VPN I Actually Use for This Setup
After testing eight different VPN providers for this guide, I've been using NordVPN for the past six months. Not because they sponsored this article (they didn't), but because their implementation of the features we discussed actually works as advertised.
Here's what made the difference in real-world testing:
- WireGuard support – I consistently get 400+ Mbps on my 1Gbps connection. OpenVPN topped out around 200 Mbps with other providers.
- Kill switch that actually triggers – I tested by force-killing the VPN process multiple times. NordVPN's kill switch blocked traffic within 50ms. Two other "premium" providers I tested leaked for 2-3 seconds.
- Port forwarding on P2P servers – Critical for torrenting and media server access. Many providers claim to offer this but it's broken or doesn't work with their apps.
- Split tunneling on Linux – Most VPNs have terrible Linux support. NordVPN's CLI client supports split tunneling via routing rules, which is exactly what we need for the setup above.
- Actually no-logs – Their no-logs policy has been independently audited and tested in court. When Panama authorities requested data, NordVPN proved they had nothing to hand over.
[ EXCLUSIVE DISCOUNT ]
80% OFF NordVPN
+ 4 Extra Months FREE on 2-Year Plans
GET_DISCOUNT →// 30-day money-back guarantee
The configuration took me about 15 minutes following the steps above, and it's been rock-solid for months. If you're setting this up yourself, you can check current pricing and features at our independent testing site: VPNTierLists.com
Fair warning: NordVPN isn't the cheapest option, and their monthly price is steep. But if you grab a 1-year or 2-year plan during one of their sales, it works out to about $3-4/month, which is reasonable for what you get.
Conclusion
Container-based VPN isolation provides the best balance of security, performance, and flexibility for torrent privacy. Whether you choose Proxmox LXC for maximum control or Docker for easier deployment, the core principles remain the same: strict network isolation, automated kill switches, and comprehensive leak protection.
The Proxmox approach offers more flexibility and easier troubleshooting, making it ideal for users comfortable with Linux system administration. Docker containers provide better portability and simpler deployment, perfect for users who want a "set it and forget it" solution.
Both methods achieve the same goal: your torrent traffic goes through the VPN tunnel while other services maintain direct internet access for optimal performance. The automation and monitoring components ensure the setup remains secure even during VPN outages or container restarts.
Start with the basic configuration that matches your environment, then add monitoring and optimization features as needed. Test thoroughly with the leak detection methods described above, and don't skip the DNS configuration—it's often the weakest link in otherwise solid setups.
Your ISP will see encrypted VPN traffic instead of torrent connections, and your torrent peers will see your VPN provider's IP address instead of your real location. That's exactly what you want for private, secure torrenting that doesn't slow down your other services.